Have you ever wanted to tweak your WordPress site just a bit, like change a button’s color or adjust a page’s layout? WordPress is great for building sites without coding, thanks to its easy dashboard and endless themes and plugins. But sometimes, to get things just right, you need to roll up your sleeves and edit the code yourself whether it’s simple changes to HTML and CSS, or even PHP edits to theme or plugin code. It might sound daunting, but it can be a simple way to make your site your own. Let’s walk through how to do it step by step.
Before we start: Messing with code can sometimes mess up your site. So, please back it up first! We also recommend a staging area for testing changes to keep your live site safe. Ready? Let’s dive in.
Editing HTML in Posts and Pages
WordPress gives you two main tools for creating content, the Block Editor (aka Gutenberg) and the Classic Editor. Both let you edit HTML directly, but in slightly different ways.
Using the Block Editor (Gutenberg)
The Block Editor splits your content into individually managed blocks (think paragraphs, images, or headings). It’s helpful for designing pages and provides a few ways of tweaking HTML depending on what your goals are.
Adding a Custom HTML Block
Need to add something specific like a custom button or a widget? The Custom HTML block is perfect for that.
1. Head to your WordPress dashboard and click Posts or Pages.
2. Open a post or page, or start a new one.
3. Hit one of the + buttons to add a new block.
4. Begin typing “Custom HTML” in the search bar and select it when it appears.
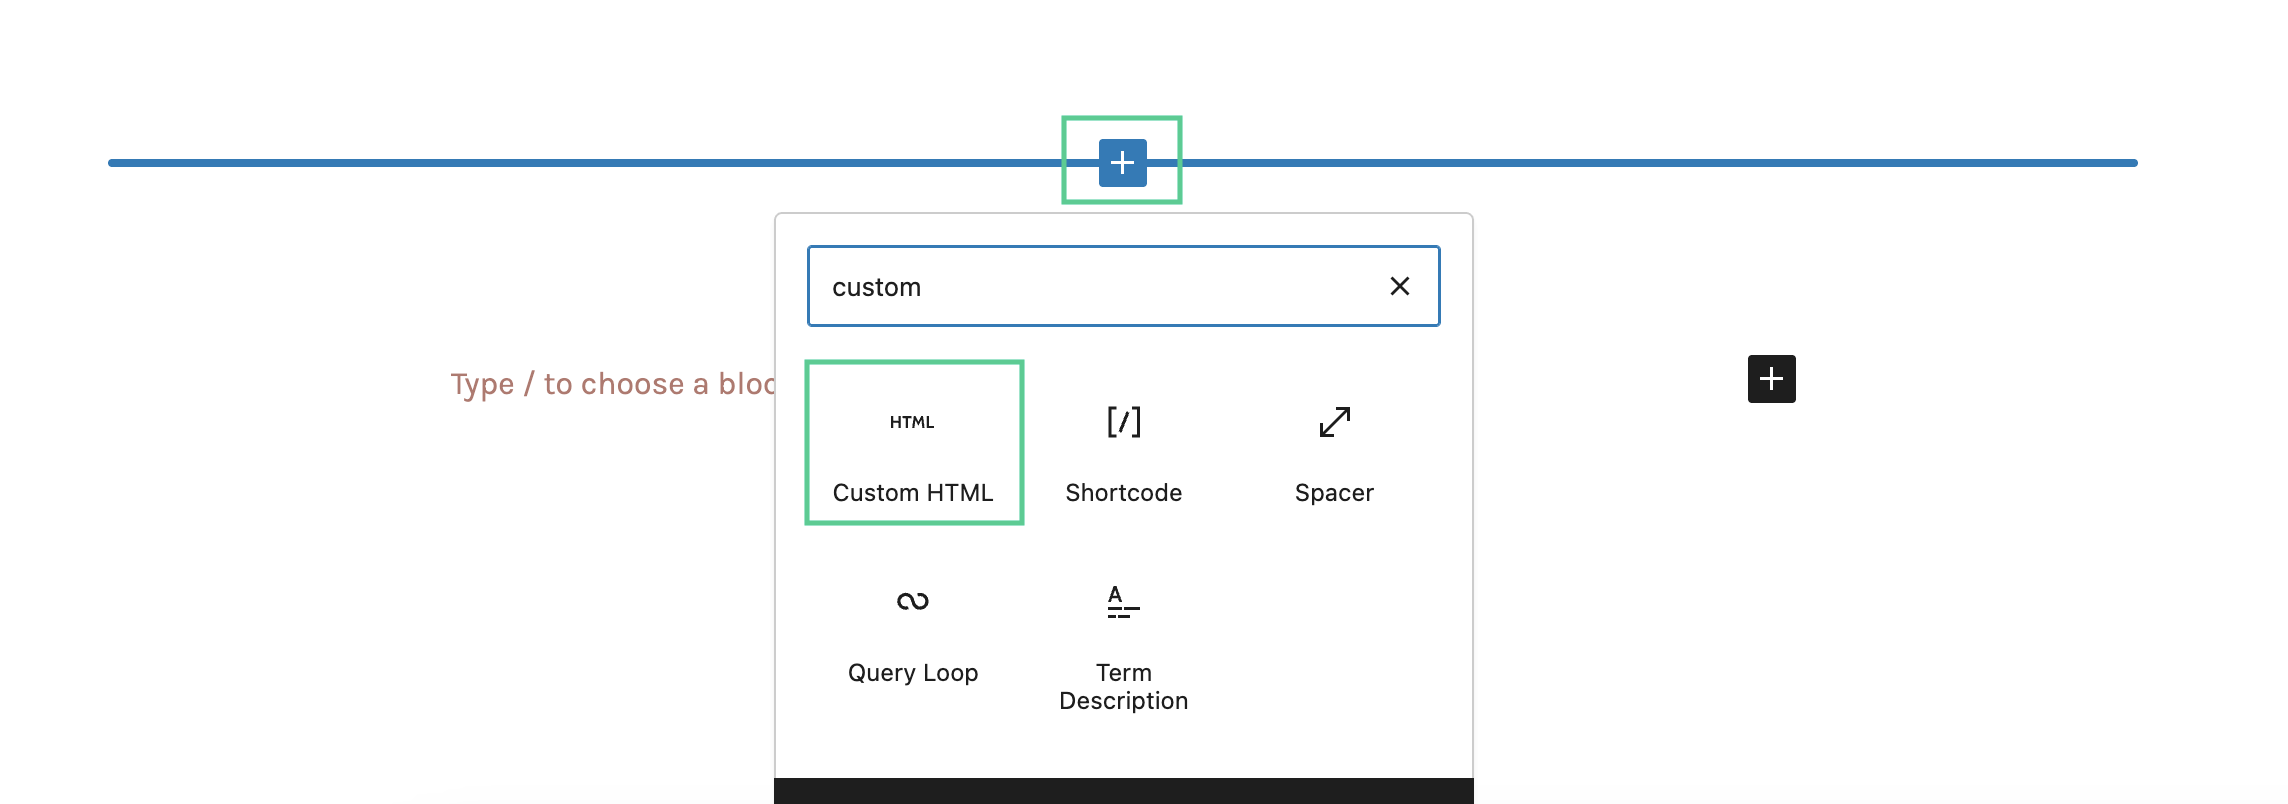
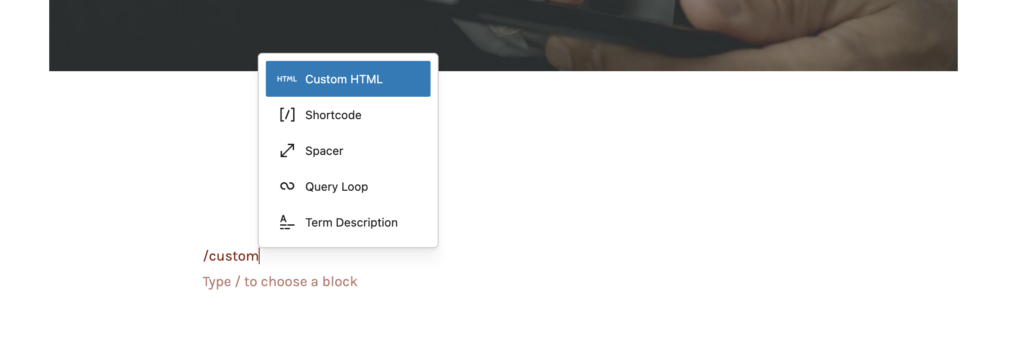
Alternatively, you can simply use forward-slash (/) commands to search and select the Custom HTML block:
5. Drop your HTML code into the block.
6. Select Preview to see how it looks.
This is great for standalone stuff like embedding something from another site without touching the rest of your content.
Editing Individual Blocks as HTML
Let’s say you’ve got a block, like a paragraph or an image, and you just need a small tweak.
1. Select the block you want to change.
2. Find the three dots in the block’s toolbar (top-right of the block).
3. Select Edit as HTML.
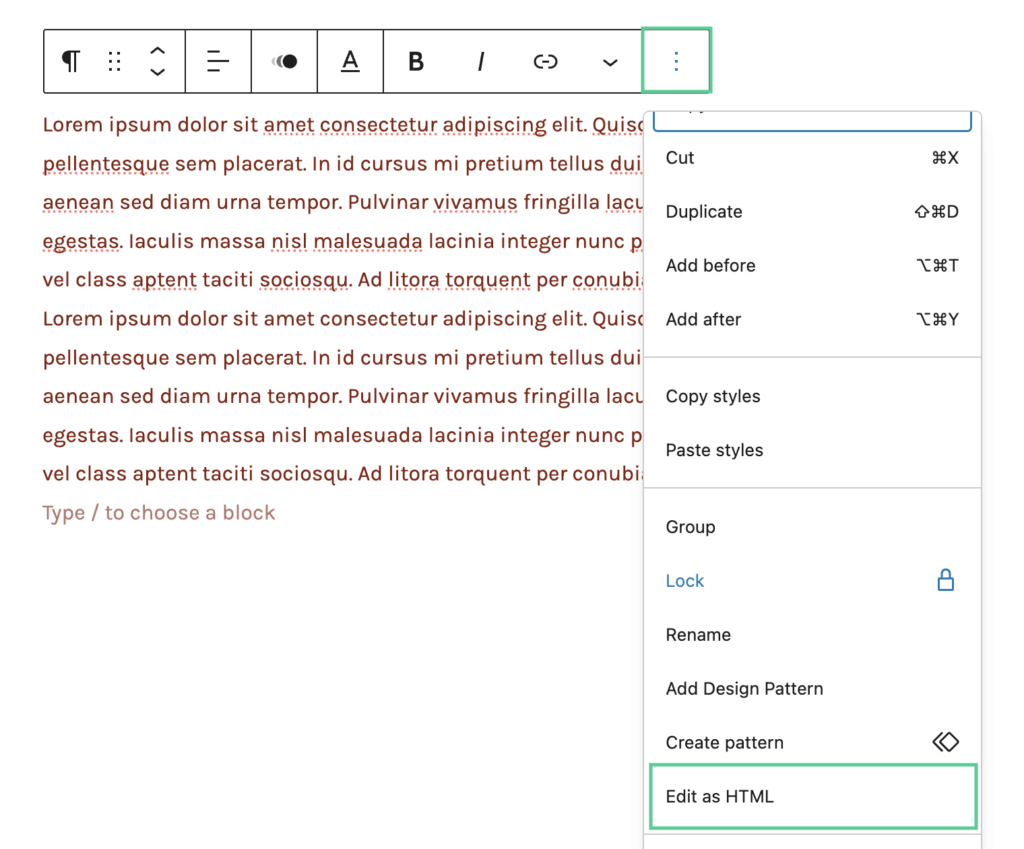
4. You’ll see the HTML for that block, make your edits there.
5. Switch back by selecting Edit visually.
This is great for little fixes, like tweaking an image’s alignment or adding something extra to a link.
Editing the Entire Post or Page in HTML
If you’re making bigger changes across the whole post or page, you can edit all the HTML at once.
1. In the Block Editor, click the three dots in the top-right corner.
2. Choose Code editor.
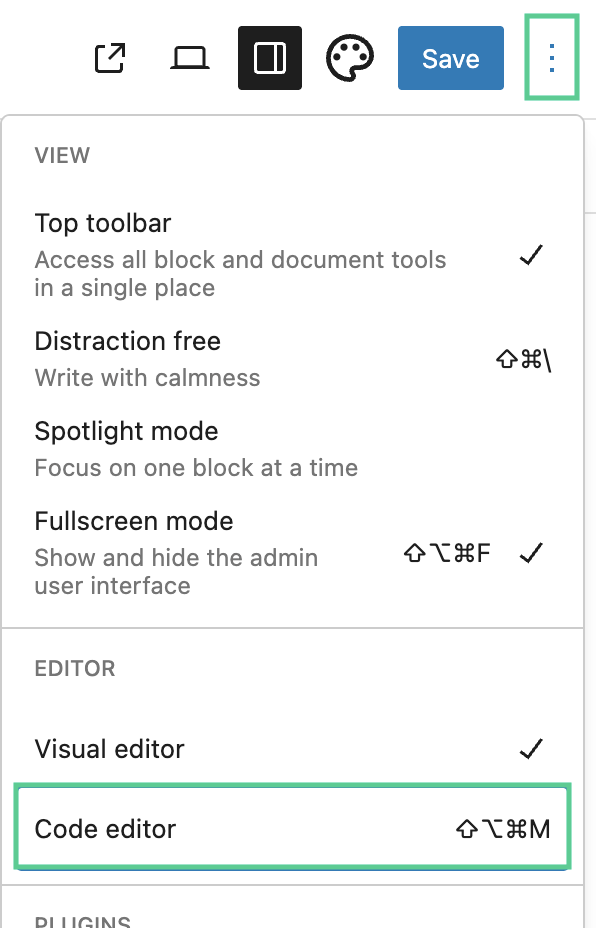
3. Now you’ve got the full HTML. Go ahead and edit it.
4. When you’re done, select Exit code editor to go back.
Heads-up: Be careful here. Changing the whole structure can mess things up, so preview it before you save.
Using the Classic Editor
If you’re using the Classic Editor, whether via the official plugin or on an older setup, editing HTML is simpler but less fancy.
1. Go to Posts or Pages and open your content.
2. At the top of the editor, you’ll see Visual and Text tabs.
3. Select Text to view and edit the HTML.
4. Make your changes, then flip back to Visual to review it.
5. Hit Save or Publish once you’re all set.
It’s a straightforward option if you know HTML and just want to quickly tweak the whole thing.
Editing CSS for Posts and Pages
CSS is what makes your site pretty. Think colors, fonts, and layouts. Your theme sets the basics, but you might want to customize specific posts or pages.
Adding Inline CSS in HTML Blocks
In the Block Editor, you can add CSS right inside a Custom HTML block with <style> tags or inline styles. For example:
<style>
  .custom-text {
    color: navy;
    font-size: 18px;
  }
</style>
<p class="custom-text">This text is styled with inline CSS.</p>
Or go straight to the element:
<p style="color: navy; font-size: 18px;">This text has inline styles.</p>This works for quick changes, but it can get messy if you use it everywhere. Imagine updating styles like this across tons of posts… yikes. It’s much better suited for one-time tweaks.
Using CSS Classes and Additional CSS
Here’s a cleaner way: add custom classes to your HTML and style them in the Customizer.
1. In a Custom HTML block (or any block’s HTML), add a class like <p class="custom-text">Text</p>.
2. Go to Appearance in your dashboard and select Customize.
3. Select Additional CSS.
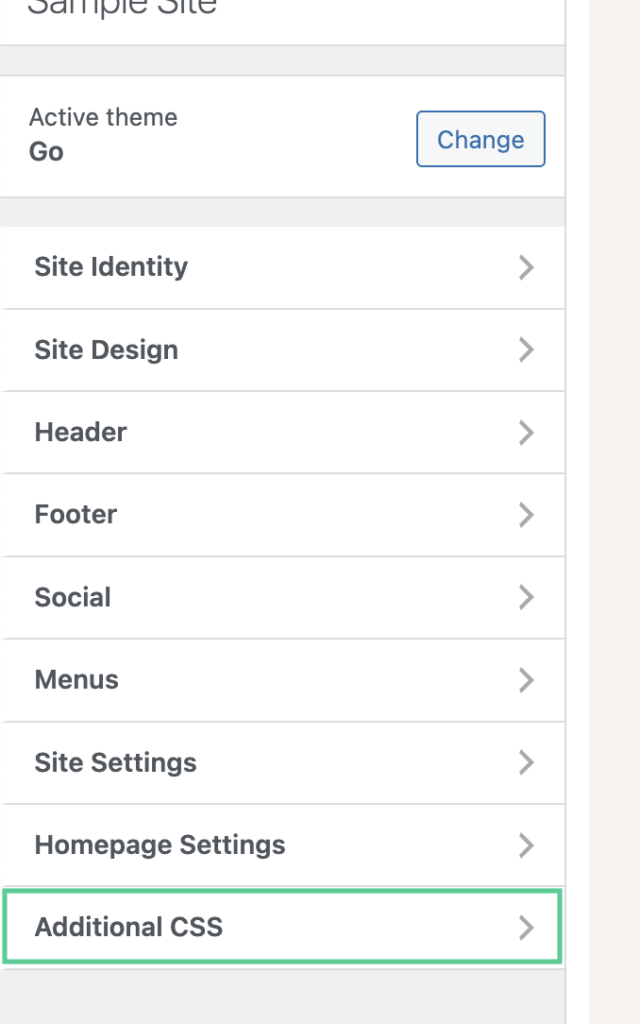
4. Add your styles there, like:
.custom-text {
  color: navy;
  font-size: 18px;
}
5. Publish it, and the styles apply everywhere that class shows up.
This keeps things organized and easy to update later, plus, your HTML stays tidy too.
Site-Wide CSS via the Customizer
Want styles across your whole site? Use the Additional CSS section in the Customizer. You could edit your theme’s stylesheet, but updates will wipe that out unless you use a child theme (more on that later). This is the way to go for big, consistent changes.
Editing PHP
PHP is the behind-the-scenes magic of WordPress, powering cool stuff like custom templates or plugin features. But it’s tricky. One wrong move can break things.
Risks of Editing PHP
- Site Crashing: A tiny PHP error can take your site down or show a blank screen.
- Lost Changes: Updating a theme or plugin wipes out direct edits.
- Security Risks: Bad PHP can leave your site open to hackers.
So, back up your site, test in a staging area, and if it feels over your head, maybe ask a developer for help.
Using Child Themes for Theme Modifications
To edit your theme’s PHP safely, use a child theme. It keeps your changes separate from the main theme, so updates don’t ruin your work.
To set one up:
1. Go to wp-content/themes/ in your WordPress files.
2. Make a new folder, like mytheme-child.
3. Create a style.css file inside it with this (Change mytheme to your parent theme’s folder name):
/*
 Theme Name: My Theme Child
 Template: mytheme
*/
4. Add a functions.php file to enqueue styles and so you can add custom PHP functions.
5. Activate it under Appearance > Themes.
Now, copy any PHP files (like page.php) from the parent theme to the child theme and edit them there. You’re safe from updates!
Caution with Plugin Edits
Editing plugin files directly? Bad idea. Updates will erase your work. Instead, use the plugin’s hooks or filters, or write your own mini-plugin. If you must tweak a plugin, keep notes and back up the originals.
Best Practices for Safe Code Editing
- Backup Your Site – Grab a plugin like UpdraftPlus and back up before you start.
- Test in a Staging Environment – Try changes on a test site first. Hosts will often have staging options.
- Use Version Control – For PHP, Git can track your changes; super helpful for child themes or plugins.
- Preview Changes – Check your HTML and CSS edits before publishing to spot issues.
- Get Help if Needed – For tricky PHP stuff, a developer can save you headaches.
Wrapping Up
Learning to edit the HTML and CSS on your WordPress site is a helpful skill. It allows you to break free from the constraints of a theme’s default settings and achieve a truly custom design. When it comes to PHP, exercise extreme caution. Understand the risks and commit to learning the proper child-theming workflow before you venture into your theme’s core files.
Of course, the ultimate peace of mind comes from knowing your site is built on a rock-solid foundation. At Pagely, we provide best-in-class managed hosting for WordPress with the performance, security, and expert support that lets you focus on your business. Whether you’re building a simple blog or a complex enterprise application, our platform is engineered to keep your site fast, secure, and always online, giving you the freedom to create without worry.