
72% of people prefer to get business communications via email and the ROI on email marketing can be as high as $38 for every $1 spent. You’ll hear people claim “email marketing is dead,” but the numbers don’t lie: email marketing is still very effective and every business should be using it to engage their prospects and customers.
Looking for the best solution for email marketing, and how to integrate with WordPress? MailChimp is one of the best email services and also one of the easiest tools to use (and integrates incredibly well with WP, which is a massive plus).
In this article, we’re going to walk you through everything you need to know about integrating MailChimp and WordPress to help stay ahead of trends in email marketing. By the end, you’ll know how to capture leads on your website with a subscribe form, automatically send new blog posts via an automated email newsletter, and we’ll recommend a slew of WordPress plugins that can supercharge your MailChimp marketing. We’re going to cover everything you need to get the two solutions fully integrated and working together seamlessly so you can leverage the power of MailChimp’s email marketing features to grow your WordPress site and engage your audience.
Let’s dive in…
WHY USE MAILCHIMP?
First things first: why should you use MailChimp as your email marketing solution?
It really boils down to one thing: simplicity. You don’t need to know any coding to create emails. Everything is drag-and-drop, meaning you can easily add text, images, links, captions, and just about anything else your heart desires.
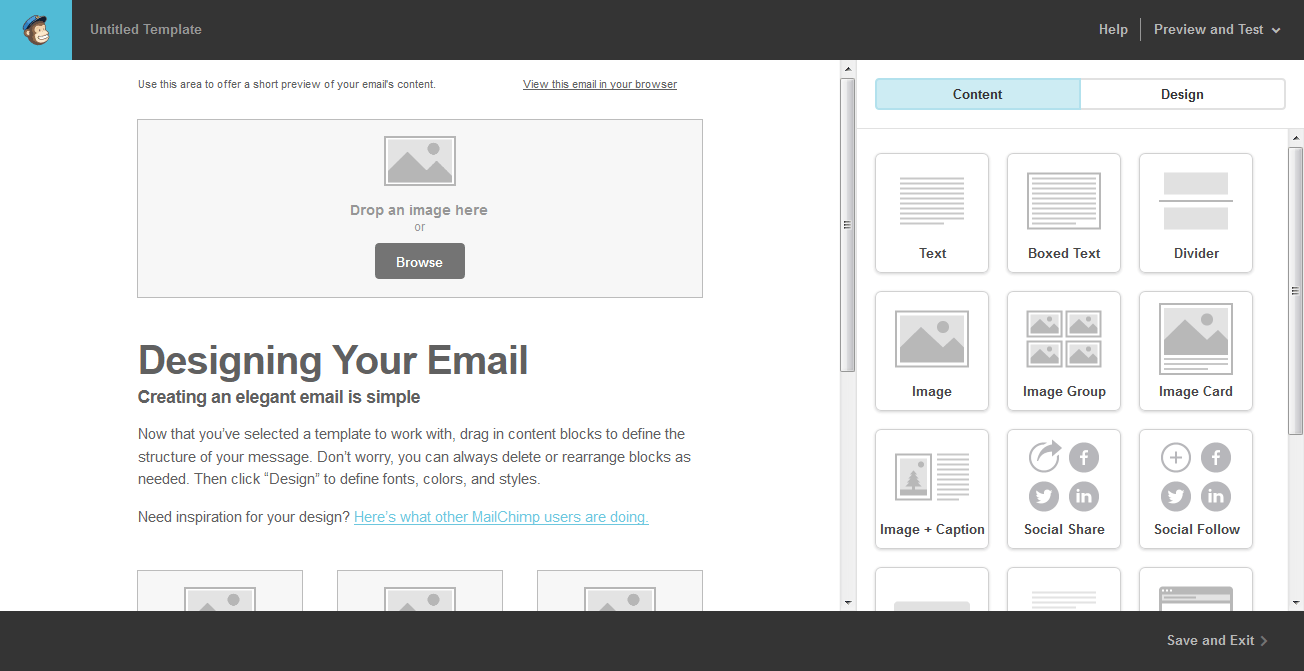
Emails are automatically mobile friendly, seeing all your statistics is a breeze, and creating simple A/B tests only requires a few clicks.
And here’s the kicker: it’s free to sign up and you get your first 2,000 email subscribers and 12,000 emails per month for free.
In terms of email marketing, MailChimp has an incredibly low barrier to entry. If you want simplicity married to functionality, Mailchimp is your golden ticket. If you’re interested in more advanced marketing automation and CRM functionality, there are more feature-rich solutions. But, if MailChimp’s refined feature set checks all the boxes for you, why use anything else?
HOW TO INTEGRATE MAILCHIMP WITH WORDPRESS
Good looks and ease-of-use are two critically important factors in getting people to subscribe to your email list. The sign-up form (a.k.a. subscription form) you put on your WordPress site needs to be easy on the eyes and easy on the brain. The more difficult or confusing it is to sign up, the less likely people will end up on your list. As a general rule of thumb, the more fields you require, the fewer email subscribers you will get. Generally, first name and email address are all you need.
Fortunately, MailChimp and WordPress are very friendly. They’re practically best friends.
ADD OPT-IN FORMS USING A PLUGIN
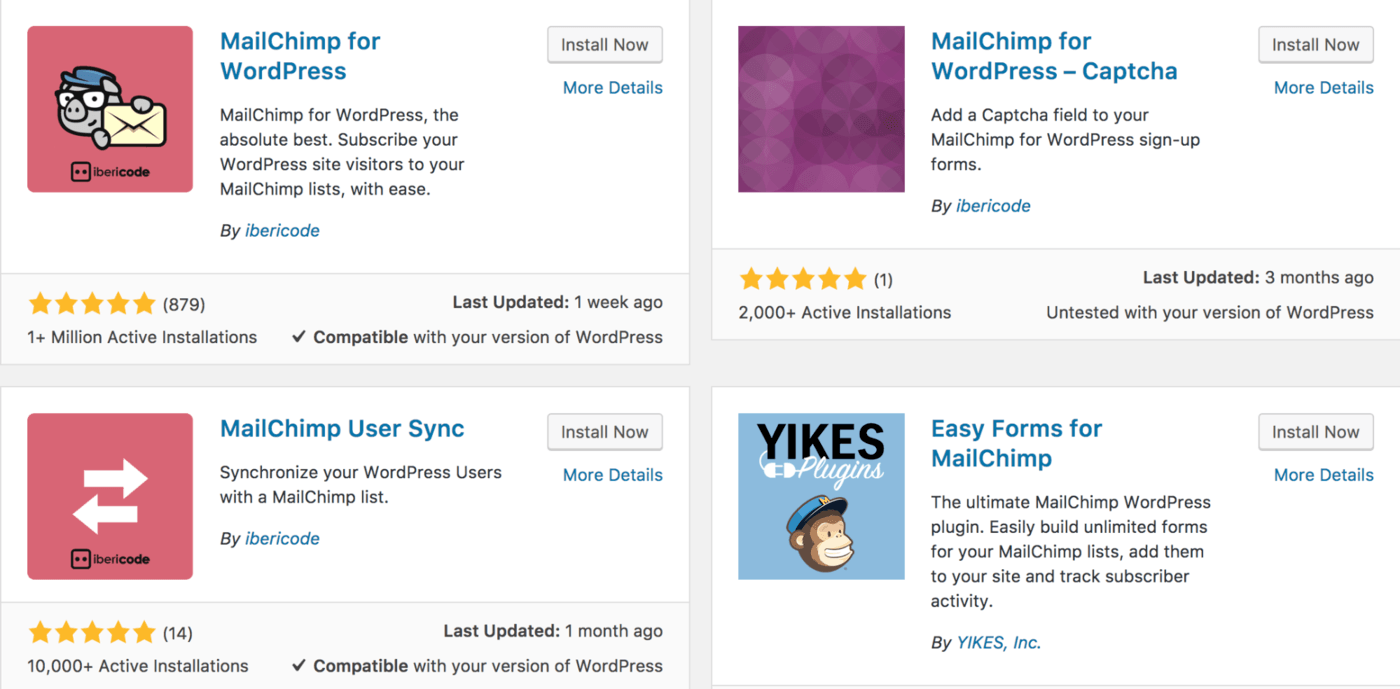
To add opt-in forms to your site install the MailChimp for WP plugin. There is also an official MailChimp for WordPress plugin created by Mailchimp, but it has fewer features, lower ratings, and is updated less frequently.
With the MailChimp for WP plugin, you can easily create and seamlessly embed customized signup forms anywhere on your WordPress site. It has nearly a perfect rating (4.8 out of 5 stars) and more than 1 million sites are using it.
Here’s how to your website’s email subscription forms set it up…
SETTING UP THE MAILCHIMP FOR WORDPRESS PLUGIN
First, go to the WordPress plugin directory and download the plugin to your computer. After you unpack it, upload it to your plugins folder within WordPress. Alternatively, you can install it directly from the WordPress backend and activate it.
Next, you’ll need to connect your MailChimp account to the plugin. To do this, you’ll need to get your API key from MailChimp and paste it within the plugin.
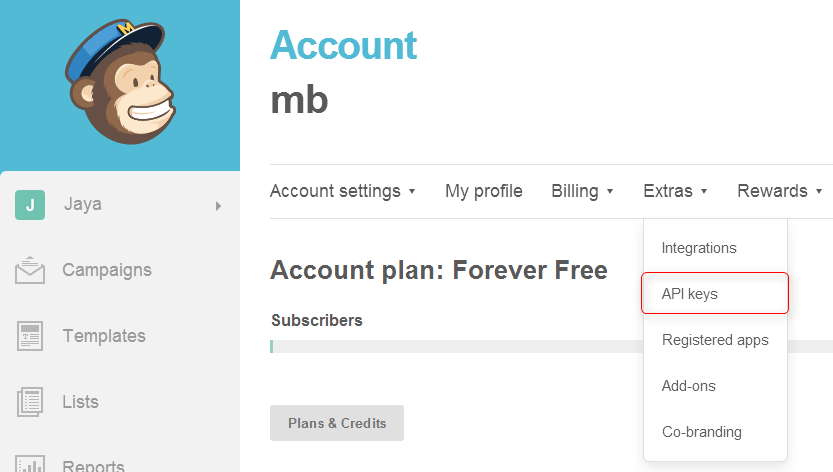
To find your API key, log into your MailChimp account, visit Account > Extras > API keys. On the API keys page, scroll down and click on the “Create A Key” option. In the API key column, you will see a box with a bunch of numbers and letters in it — copy what’s in that box.
Next, go back to your WordPress plugin and navigate to the Settings menu of that plugin. On the very first page, you will see a box where you can paste the API key. Paste it, then hit “Save Settings.”
Boom. Your plugin is now connected with MailChimp.
CREATE A SIGNUP FORM
After getting the plugin installed, you can create a signup form to put on your WordPress site.
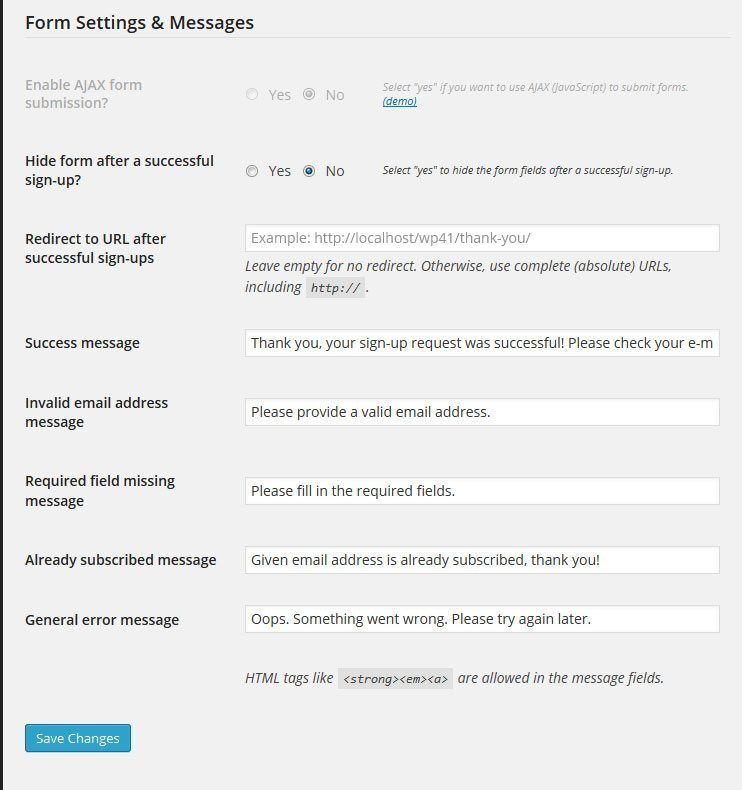
Within the plugin, go to Forms. Here you can choose the design and format of the signup form. MailChimp for WordPress has five themes to choose from and a field generator where you can customize the form by adding HTML elements.
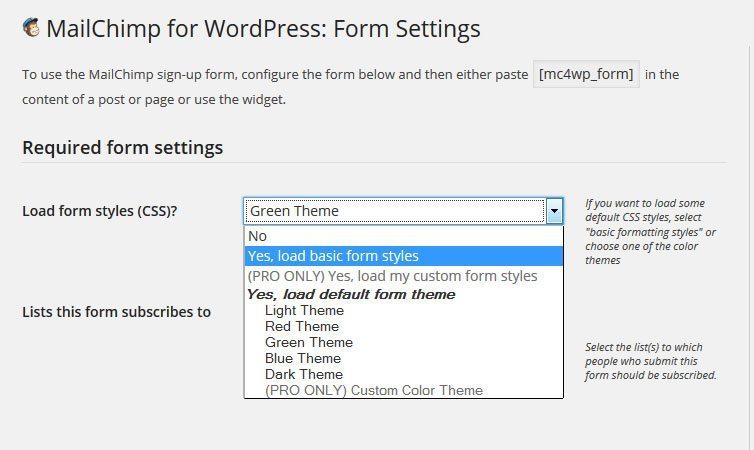
Below, you can see extra settings, like the automated messages and the redirect URL. You’ll want to be sure you select the right MailChimp list in the MailChimp settings (the one you want these subscribers added to).
PUT THE SIGNUP FORM ON YOUR SITE
There are many ways to get your signup forms on your WordPress site. The first is to use a shortcode. Underneath the builder module in the plugin is where you will find the shortcode. If you paste this anywhere within a post or page, it will automatically add the form to that spot.

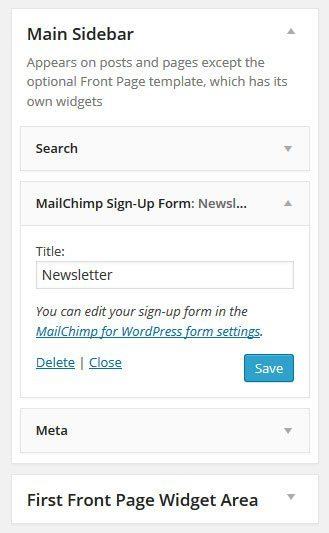
Another way is to use the MailChimp widget, which you can find by going to Appearance > Widgets in WordPress. Just drag and drop the widget to your sidebar or footer, change the title if you like, and hit save.
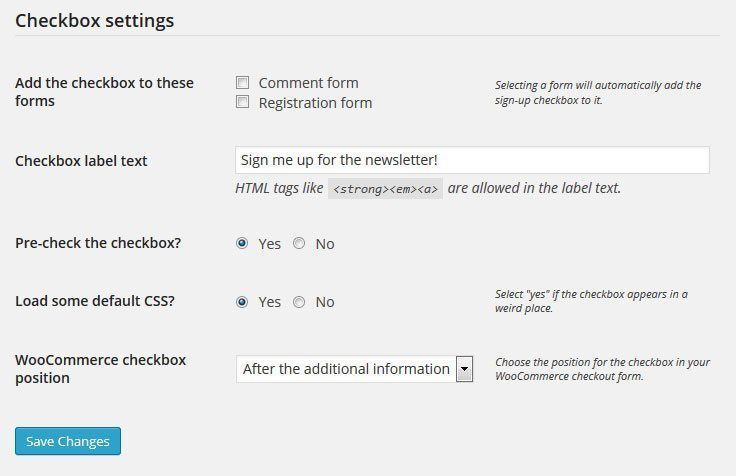
Plus, thanks to this awesome plugin, there is a third way to get a signup form on your site. You’re going to like this one. You can allow anyone who writes a comment or uses a contact form on your site to sign up to your email list. Simply go to the Checkbox settings to activate this option. Cool, right?
With your form placed on your site, your website visitors can submit their info via the form and be automatically added to your MailChimp list so they’re ready and waiting for your next email campaign.
ADDING FORMS MANUALLY
If you want to get slightly more technical, you can add MailChimp opt-in forms manually to your site.
Instead of using the plugin, you can go through your MailChimp backend. Many developers prefer this route.
To do this, go to the Lists page within MailChimp. Next to the name of your email list, you’ll see a drop-down arrow next to the Stats button. One of the options from that drop-down arrow is Signup Forms. Click it.
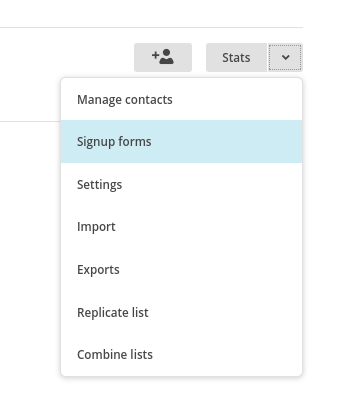
On this page, you will see some different options: General forms, Embedded forms, Subscriber popups, Form integrations.

If you click on Embedded forms, you can then design your signup form. Once you’ve chosen your template (Classic, Super Slim or Naked) and selected what fields you want, you can scroll down under the header “Copy/paste onto your site.” That box has the HTML code that you will copy and paste within your post or page.
When you paste the HTML on your post or page, make sure you switch over to the “Text” view rather than the “Visual” view.

SUPERCHARGING YOUR MAILCHIMP-WORDPRESS MARKETING
MailChimp and WordPress are a power couple, and if you know what you’re doing, you can really take things to the next level.
Here are some ways you can take this MailChimp-WordPress integration and knock it out of the park. These tips will help you make the most of it all.
AUTO-SEND BLOG POSTS TO YOUR EMAIL LIST
MailChimp has a feature called “RSS-driven campaigns.” What that means is you can have MailChimp automatically out an email every time you write a blog post. This is an easy way to keep people up to date with the action happening on your blog.
HOW TO SET UP AN RSS-DRIVEN CAMPAIGN THROUGH MAILCHIMP
An RSS feed is something that is automatically created by your blog. Every time you add a new post, it goes into the RSS feed. MailChimp can use that feed to pull the full or partial content of your blog posts into emails, and then send those emails to your list.
First, you’ll need the URL of your RSS feed (side note: if you want to send your subscribers content from multiple RSS feeds, you can use MailChimp’s FEED merge tag, or use a feed aggregator like RSSUnify or RSS Mix).
Although the content that goes out depends on what you post on your site, you can use MailChimp to customize when to email the content to your subscribers.
In WordPress, the link to the RSS feed is often times www.yoursitename.com/feed.
To set up the RSS-Driven Campaign, navigate to the Campaigns page and hit the “Create Campaign” button. In the popup box that appears, choose “Create an Email.”

Choose the Automated tab then choose “Share blog updates.”
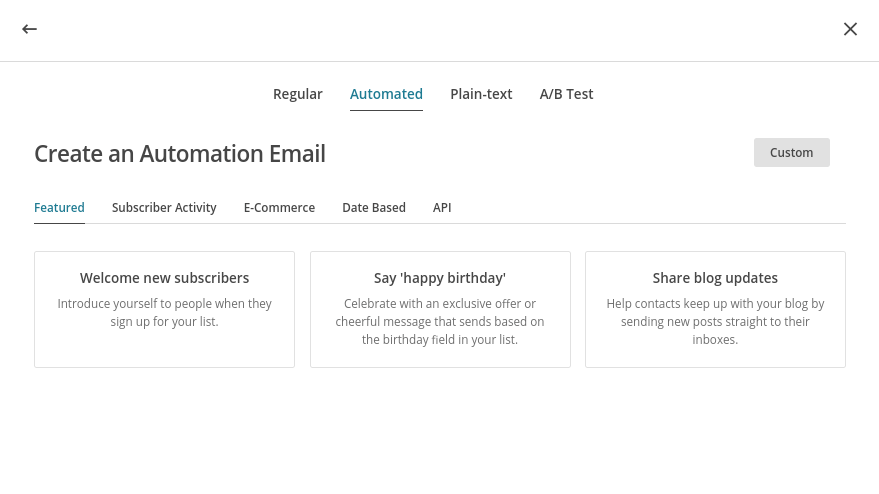
Enter the name of your campaign, choose the list you’ll be sending this to, then hit “Begin.”
On the next page, you’ll enter the RSS feed URL, how often you want this auto-send to go out, and choose the template and design of the auto email.
And now you’re all set! When a new post is published, MailChimp will automatically grab the info from your RSS feed and place it into an email campaign so it can be delivered to your email subscribers.
ADDITIONAL PLUGINS TO USE WITH MAILCHIMP
Numerous companies have created WordPress plugins specifically designed to improve your MailChimp email marketing even further. Here are some of the most popular ones.
SUMOME
SumoMe is a powerful suite of marketing tools used by thousands of companies. If you are serious about growing your email list fast, you should consider investing in SumoMe. They have some incredibly unique ways to get subscribers, like the “Welcome Mat”, “Hello Bar”, and more. SumoMe integrates nicely with WordPress and MailChimp and is able to automatically add subscribers to your list.
GRAVITY FORMS
Gravity Forms is an extremely popular WordPress form building solution. If you need more options or more complex forms than the simple MailChimp signup forms they provide by default, Gravity Forms can probably handle it. It’s a proven, time-tested solution with a great reputation and we recommend it without hesitation.
WUFOO
Wufoo is a tool that allows you to quickly build and customize subscriber forms. With the free package, you get five custom forms, 100 entries, 10 fields, and stats. Wufoo is designed to be both powerful and easy to use. If you want a lot of options for designing your opt-in forms, this is a good choice.
MAILCHIMP WD
This plugin allows you to create wonderful looking subscription forms with some cool fields. You also have the option of adding PayPal integration and hiding or displaying certain fields depending on the selections your users make.
The PayPal integration is especially useful if you’re taking payments through PayPal and then want to add those customers to your email list.
ANALYTICS360
MailChimp has stats and reports you can look at, and so does WordPress. But don’t you want to go deeper than that? If you’ve ever wondered how the rate of new subscriptions correlates with your website traffic, Analytics 360 from Google can answer those types of questions.
Basically, this plugin puts everything in one place. It takes your Google Analytics and MailChimp tracking data and puts it neatly within your WordPress dashboard.
Efficiency is a key characteristic of a successful business.
MAILCHIMP FORMS BY MAILMUNCH
Like SumoMe, MailMunch is a suite of tools designed to help marketers grow their email lists fast. It has a variety of lead capture forms, including scroll mats, advanced pop-up forms, slide boxes, and a lot more.
If you’re really looking to supercharge your MailChimp marketing, this might be the right solution.
EASY FORMS FOR MAILCHIMP
Unfortunately, MailChimp’s standard opt-in forms are pretty ugly. As great as MailChimp is in terms of simplicity, it’s not the best when it comes to collecting email addresses. That’s why plugins like Easy Forms are useful. If you really want to customize the look and feel of your form, this plugin has built-in CSS classes that can dramatically improve the look.
WOOCOMMERCE MAILCHIMP
If you sell products using WooCommerce, you’re going to want to use this plugin.
With this plugin, you can integrate WooCommerce with MailChimp, automatically assigning customers to their preferred email lists and MailChimp interest groups after finishing an order.
You can then create your own interest groups and add subscribers based on the list they belong to.
Additionally, you can add an opt-in option at the checkout page, giving customers yet one more opportunity to get on your email list.
MAILCHIMP ACTIVITY
The MailChimp activity plugin lets you see all your MailChimp stats in your WordPress dashboard. This means you don’t even need to login to MailChimp to get a feel for what’s happening with your list.
MAILCHIMP COMMENTS
This is a fantastic way to build your list through the comments on your WordPress blog. When a person comments on a post, they’re given the option of signing up for your email list. If they do, you can automatically direct them to different lists depending on the post they comment on.
GO FORTH AND CONQUER!
You now have everything you need to conquer email marketing with MailChimp and WordPress. Yes, you should keep using social media to promote your business and brand. But unlike social media, in which people are randomly scrolling through hundreds of random posts, email has the ability to grab people’s full attention. When something shows up in their inbox, they need to take action on it, even if that action is deleting the email.
The world is yours!
Thanks for this article. I recently started adding Mailchimp emails to my art practice. I am sure one of these solutions will help it along. I have a basic knowledge of WP, and finding a way to get the site to work better with my email lists can be encouraging.