
Thanks to landing page tools like Unbounce and LeadPages, creating a custom WordPress landing page is easy, fast, and fun. Since landing page tools are so efficient, they’re great if you have a large marketing campaign with many landing pages, or if you’re looking to save some time
However, there are also many great benefits to coding a custom page, including:
- Homemade landing pages are infinitely more customizable. If you want to create a page that goes beyond the limit of standard fonts and buttons, you should probably code it yourself.
- Custom landing pages are more economical. You don’t have to keep paying a third party service to support your page, nor do you have to contract an engineer to build it.
If you’re looking for more customization at a better price, and you have a little bit of HTML and CSS knowledge, then you’re probably ready to code your own page. Here are 9 steps to code a custom WordPress landing page that’s optimized to your company’s needs.
Step 1: Build a child theme
To create a custom WordPress landing page, you must first create a child theme. Since parent themes should never be customized, child themes are a great opportunity to create unique pages designed for your audience. Creating a WordPress child theme is very simple, so I won’t go into too much detail on how to build one. If you need some guidance, here’s a great tutorial on how to create a child theme in WordPress.
I will mention that it’s important to have two files in your child theme directory: styles.css and functions.php. These two files are required for child themes. With style.css, you can easily add additional CSS styling in your theme. With functions.php, we can properly enqueue styles and javaScript files.
Step 2: Create a style.css file
Add the following code at the beginning of your style.css file:
/*
 Theme Name:   Landing Page Theme
 Description:  Twenty Sixteen Child Theme With custom landing page
 Author:       Tahir Taous
 Author URI:   https://pagely.com

/blog
 Template:     twentysixteen
 Version:      1.0
 Text Domain:  twentysixteen-child
*/
Step 3: Create a functions.php file
In your child theme folder, add the following markup to register your parent and child style sheet files:
<?php
// Parent Theme Styles //
// https://codex.wordpress.org/Child_Themes //

function theme_enqueue_styles() {

    $parent_style = 'parent-style';


    wp_enqueue_style( $parent_style, get_template_directory_uri() . '/style.css' );
    wp_enqueue_style( 'child-style',
        get_stylesheet_directory_uri() . '/style.css',
        array( $parent_style )
    );

}
add_action( 'wp_enqueue_scripts', 'theme_enqueue_styles' );
Step 4: Install and activate
Now you can install and activate your child theme. To create and test WordPress themes, I prefer to set up a WordPress site locally on my PC. You can very easily set up a WordPress site on MAC or Linux You can also use Windows with WAMP server, MAMP server or Bitnami WordPress installer.
Next, upload your theme and activate it. To make sure your child theme is working, try adding some simple styles.
Add the following styles in your child theme’s style.css file and reload your front page.
body, #page {
    background: #ECE8C1;
}
Here, we have added a new background color to the body. If you can see the new background color, it means everything is working smoothly so far
Step 5: Create a custom page
Now, we’re going to create a new custom page in our child theme. Create a new file in your child theme and save it as page-landing.php file.
Add the following code in page-landing.php file:
<?php
/**
Template Name: Landing Page
**/
?>
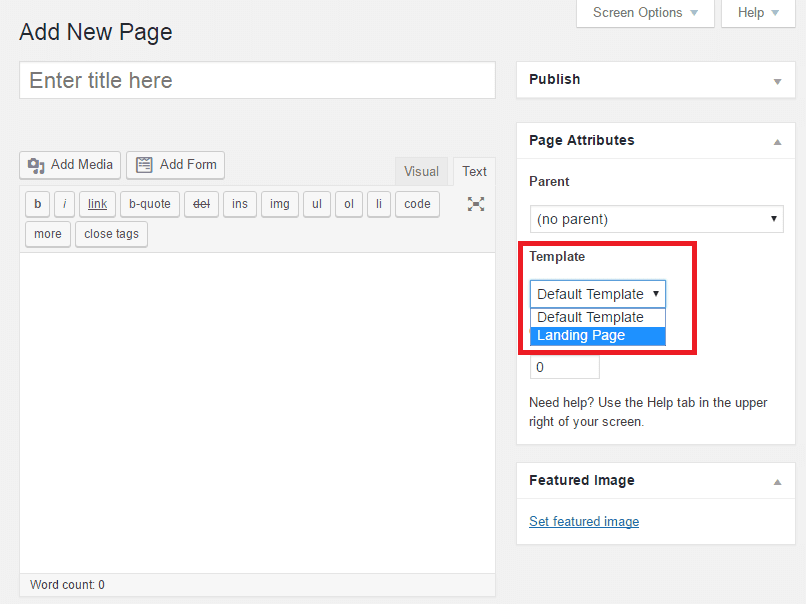
Under the Template dropdown, choose your landing page. Add your copy and set a large image as the feature image (this will be your landing page background). Then, publish this page.
If you preview your page here, you’ll see a blank screen. This is totally normal because we still need to add the necessary markup in our page-landing.php file for our content to display.
Step 6: Add images
We’re going to use the featured image you added in step 4 as the full-screen background image for our landing page. To do so, use the following code in your page-landing.php file:
<?php
/**
* Template Name: Landing Page
*/
?>

<!DOCTYPE html>
<html <?php language_attributes(); ?> class="no-js">
<head>
    <meta charset="<?php bloginfo( 'charset' ); ?>">
    <meta name="viewport" content="width=device-width, initial-scale=1">
    <link rel="profile" href="http://gmpg.org/xfn/11">
    <?php wp_head(); ?>
</head>

<body <?php body_class(); ?> style="background: #6FBB72 url(<?php echo $src = the_post_thumbnail_url( '' ); ?> ) repeat 50% 0 fixed !important;">
Now, preview your landing page and you should see a large featured image, nothing else.
Step 7: Add a custom header
Next, add the following code in your page-landing.php, after the body tag:
<div id="landing-page" class="hfeed site">

    <div class="site-branding">
        <p class="site-title aligncenter"><a href="<?php echo esc_url( home_url( '/' ) ); ?>" rel="home"><?php bloginfo( 'name' ); ?></a></p>
    </div><!-- .site-branding -->
Preview your landing page again. You should see your site title, a white background, and the large featured image as the background image. To remove the background color, add the following style in your style.css file.
.site {
    background-color: transparent;
}
Step 8: Display your content
As of now, you can see your site title and your featured image as a background image on your landing page. To display the rest of your landing page content, we’re going to add the required markup.
Just below this <!-- .site-branding --> line, add the following markup in your page-landing.php file:
    <div class="sidebar sidebar-bribe">

    <?php if (have_posts()) : ?>

      <?php while (have_posts()) : the_post(); ?>

        <h1 class="landing-title"><?php the_title(''); ?></h1>

        <?php the_content(); ?>

         <!-- https://codex.wordpress.org/Function_Reference/wp_link_pages -->
       <?php endwhile; ?>

    <?php endif; ?> <!--  mdl-cell-8 //#primary  -->
</div>
After that, your landing page is almost complete. View your landing page and you should see the following: your large featured image as the background image, your site title, and the rest of your content including your offer.
Step 9: Add styles with CSS
To make your landing page stand out visually, you need to add the necessary styles. Open your style.css file and add the following code in it. Then, save the style.css file and reload your landing page again.
.site {
    background-color: transparent;
}

div#landing-page {
    max-width: 900px;
    margin: 0 auto;
}
div#landing-page .site-branding .site-title a {
    color: #4CAF50;
    background-color: #FFFFFF;
    background-color: rgba(255, 255, 255, 0.79);
    padding: 5px;
    border-radius: 5px;
}

label, input {
    margin-bottom: 14px;
}

#landing-page .sidebar, #landing-page .sidebar-bribe {
    background: #67CA6B;
    background: rgba(103, 202, 107, 0.87);
    border-radius: 10px;
    box-shadow: 5px 3px 9px #5B6766;
    padding: 0;

}

h1.landing-title, .landing-content {
    padding: 1em;
    color: #fff;
}

h1.landing-title{
    padding-bottom: 0;
    line-height: normal;
}

h1.landing-title small {
    color: #650801;
    font-size: 75%;
    display: block;
}

#landing-page button, input[type="submit"]
 {
    background: #E91E63;
    display: block;
    width: 100%;
}

@media screen and (min-width: 56.875em){

#landing-page .sidebar {
    float: left;
    margin-left: 50%;
    padding: 0;
    width: 50%;
}
}
You can see the final result of our custom landing page in the screenshot below.
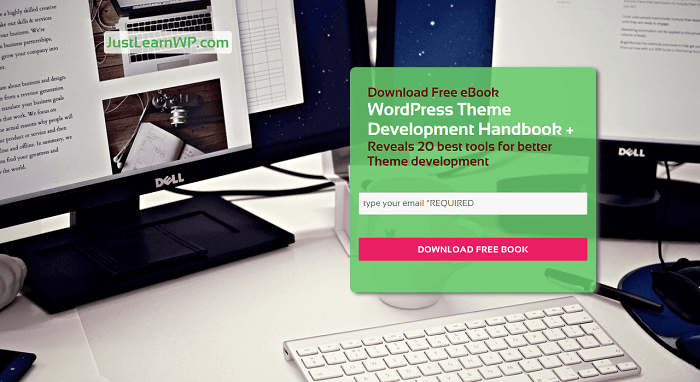
Your Custom WordPress Landing Page
For more help on creating a custom WordPress landing page, you can download this landing page tutorial for free. While I used the twenty-sixteen theme, the steps outlined in this post can be used with your existing theme as well. If you’re interested in learning about landing page design, copy, and optimization, read our post on how to create effective squeeze pages that drive conversions.