
It’s not always ideal, but occasionally you’ll need to completely reset WordPress to its original state. Before blindly jumping to use a plugin, it’s important that you understand exactly what it means to reset WordPress.
Understanding the ins and outs of a WordPress installation (and what needs to be reset!) will help ensure that you’re making smart decisions in your development process. Sometimes your chosen reset plugin doesn’t work as expected and you’ll need to clean up manually, for example. Being able to do this ensures that you’ll be able to quickly rectify the situation. If you use Managed WordPress Hosting don’t forget to speak to your host first.
In this article, you’ll learn about when and why you might want to reset WordPress. Then, we’ll walk you through the necessary steps for manually resetting a WordPress website. Let’s get started!
Why You May Need to Reset WordPress
To reset WordPress means to put all its files and databases back to the original installation state. It is effectively taking an existing WordPress website and installing it from scratch using what’s already there.
There are a few reasons you may need to fully or partially reset your WordPress website, such as:
- Rebuilding or repurpose the website.
- Restoring the site from a backup.
- Cleaning out a test installation.
Resetting a WordPress website is essentially uninstalling existing settings and reinstalling the original defaults. This is possible to do by deleting everything and starting over. However, you may find yourself in a situation where you need to do a partial reset, so it’s handy to understand the breakdown of steps so you can pick and choose what you need. For example, you may want to reset the database but keep all your downloaded plugins intact.
Similarly, you can accomplish a lot of manual tasks using plugins like Reset WP or even WP-CLI. We find it’s always a good idea to understand the fundamentals even when using these tools. It’s similar to learning how long division works before using the calculator — you’ll better understand what you’re doing even if you eventually automate the process. Knowing how to check your work can save a lot of time and hassle if something goes wrong.
Now, you’ll learn what it takes to reset your WordPress website without a plugin.
How to Reset Your WordPress Website Without a Plugin
Resetting your WordPress website will involve having direct access to your files and database. This means you’ll need a few tools and logins to get started:
- Your File Transfer Protocol (FTP) username and password.
- FTP software, such as FileZilla.
- Database access, such as through phpMyAdmin or within cPanel.
If you’re not completely sure you want to lose all of your content and settings forever, you may also want to take a complete backup of your website, using a plugin such as UpdraftPlus. Be sure to save the backup somewhere off of the server, because you’ll be deleting everything. Now, all you need to do is follow these steps. Let’s get started!
Step 1: Delete the Database
The first step is to delete your database. This is important because it’s where all of your settings and content lives. Without this step, you’ll be stuck with everything you already have, which isn’t conducive to starting afresh.
Deleting the database will completely remove your content and settings from WordPress. We cannot stress enough that you need to be absolutely certain you are ready to lose all of your data before moving forward.
First, log into cPanel. From here, you should be able to find your list of MySQL databases under the Databases > MySQL Databases section:
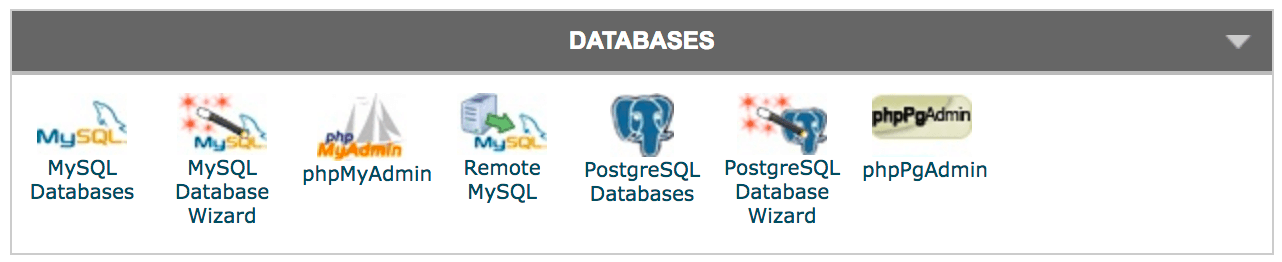
On this page, you should find a list of your existing databases. Some hosts name their databases differently but typically include the prefix wp somewhere within the database name.

Identify your WordPress database, and copy and paste the name into a text file somewhere safe. Then, you can delete it by clicking the Delete button from the Actions column. This will completely wipe out your old WordPress database.
Step 2: Create a New Database
While you’ve just deleted the old database, it’s vital to set up a new one. Without a database, your WordPress website will not be able to load and you will not be able to access the dashboard to create any new content.
Once your old database is gone, it’s time to create a new one and set it up for WordPress. You should still be within the cPanel database page, so find the Create a New Database section. Here, you’ll complete the database name so it matches the old one:

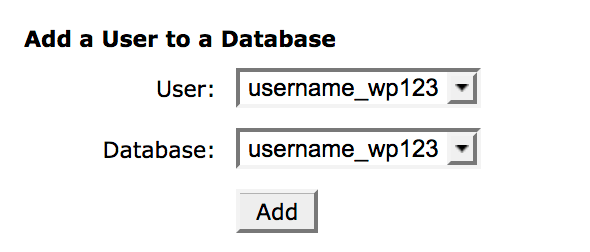
After clicking Create Database, the page should refresh and you’ll see the name pop up again under the Current Databases area. Next, find the Add a User to a Database section. You’ll need to add the old user with its permissions to the newly created database. Select the matching database and username in the drop-down menus and click Add User.
If you can’t find the old user, you may need to create it manually. This is easily possible under the Add a New User section. If possible, use the same username and password as the old database user. You can usually find these in your website’s wp-config.php file.
In your FTP program, navigate to your website’s public_html folder. From here you should see the WordPress root files. Right click on wp-config.php and choose View/Edit within your FTP program:

You don’t need to edit anything once you’re looking at the file. Instead, find the credentials for your old database user under MySQL Settings in the file.

Once you have these credentials, you can use them to recreate the correct user in MySQL. Don’t forget to follow the prior directions and add the user to the database once you’ve created it!
Step 3: Remove Unnecessary Files
With a clean database, you are now left with all the plugins, themes, and uploads you added to the old website. It’s important that you remove these, or you’ll have tons of unnecessary bloat on your new website. This isn’t preferable on a fresh site.
Now that your database is cleared up, you’ll want to turn your attention to your WordPress files. Most WordPress files remain the same between installations. What you’ll want to address are unique additions, such as plugins, themes, and media. These all exist within the wp-content folder.
You can delete these via FTP. Log in using your favorite FTP application, and navigate to your WordPress’ root directory under public_html. Find the wp-content folder and navigate inside.
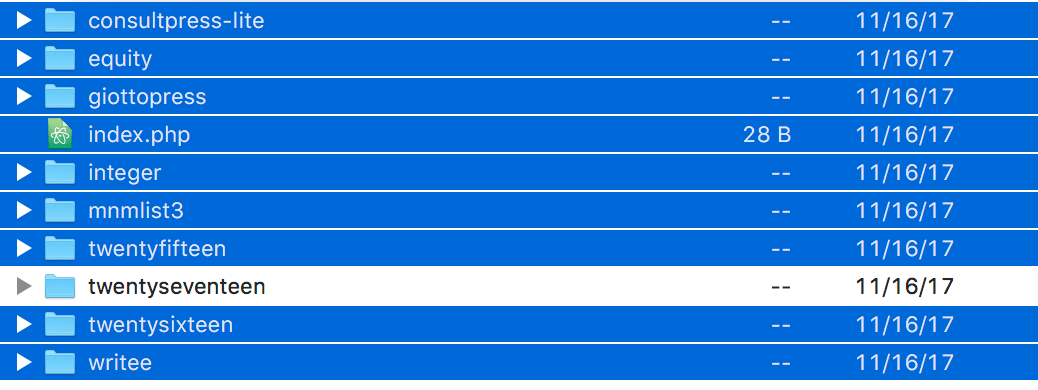
At this point, you should see plugins, themes, and uploads folders. You may also see a few others. Select every folder except for themes and delete them all.
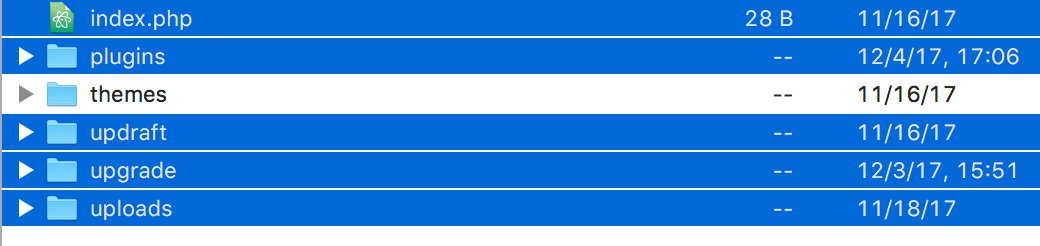
Next, navigate inside the themes folder. Choose the theme you’d like to keep, such as WordPress’ Twenty Seventeen. Select every theme folder except for your chosen theme, and remove them from the server.
At this point, you have now wiped out all unique elements related to your WordPress website. The database is completely empty, and all unique files have been removed. All that’s left is to reinstall WordPress from scratch!
Step 4: Run the WordPress Installation Script
At this point, everything in your WordPress site is sanitized and cleaned out. Unfortunately, if you leave it at this stage, you’ll not have a functional website — you need to rerun the WordPress installation script.
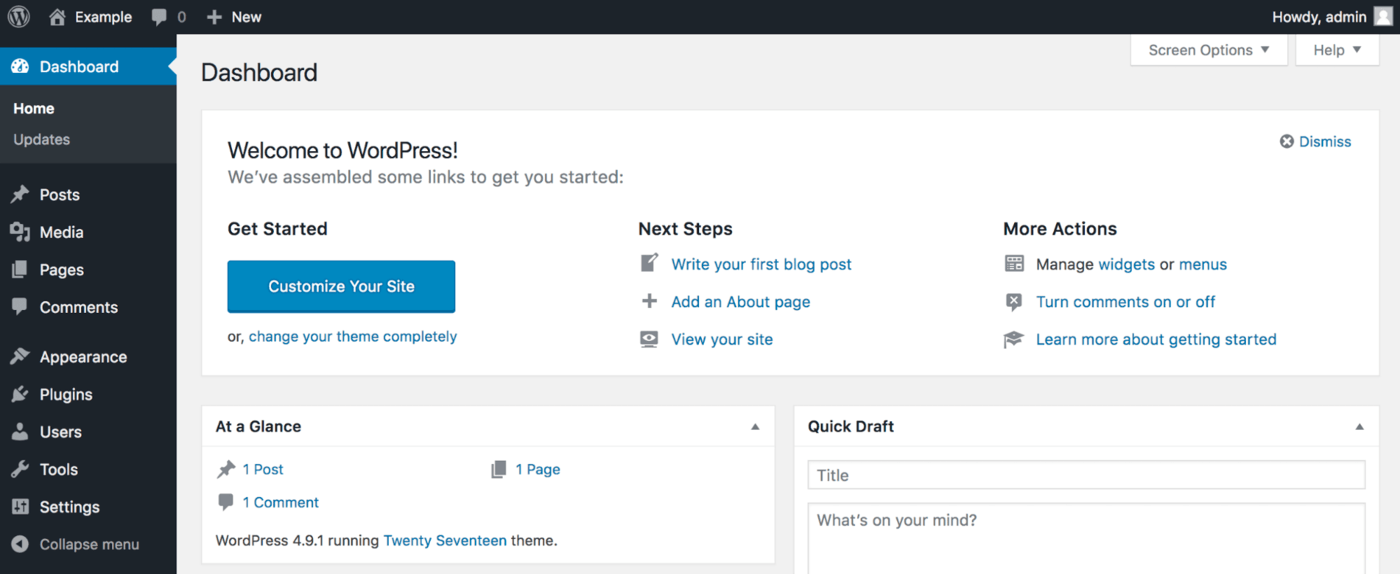
Finally, you’re ready to revert WordPress back to its default settings. You can load up the installation script by adding /wp-admin/install.php to the end of your domain name. You’ll need to pick out a few settings, such as language and your new login information:
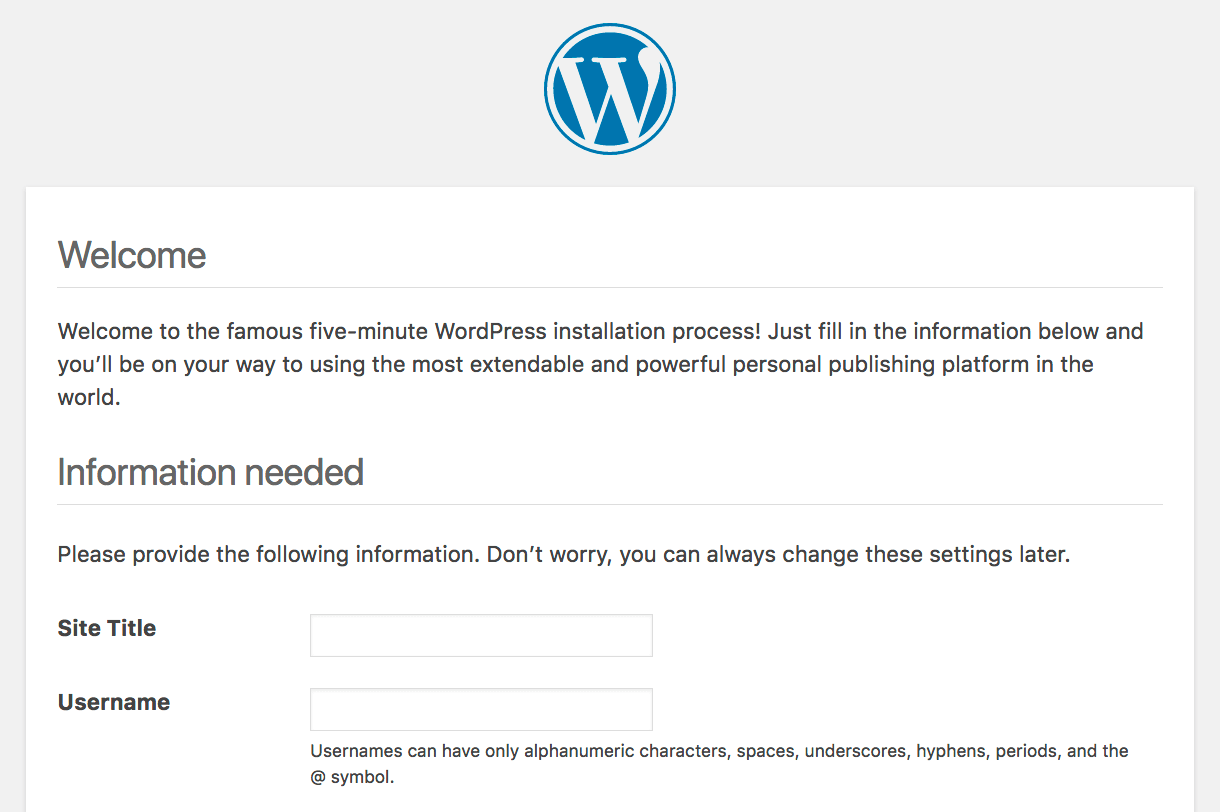
Without this process, your database is completely blank. If you don’t run this script, WordPress will be unable to function. Once you’ve filled in the entire form, you can click Install WordPress. You’ll be greeted with a welcome message:
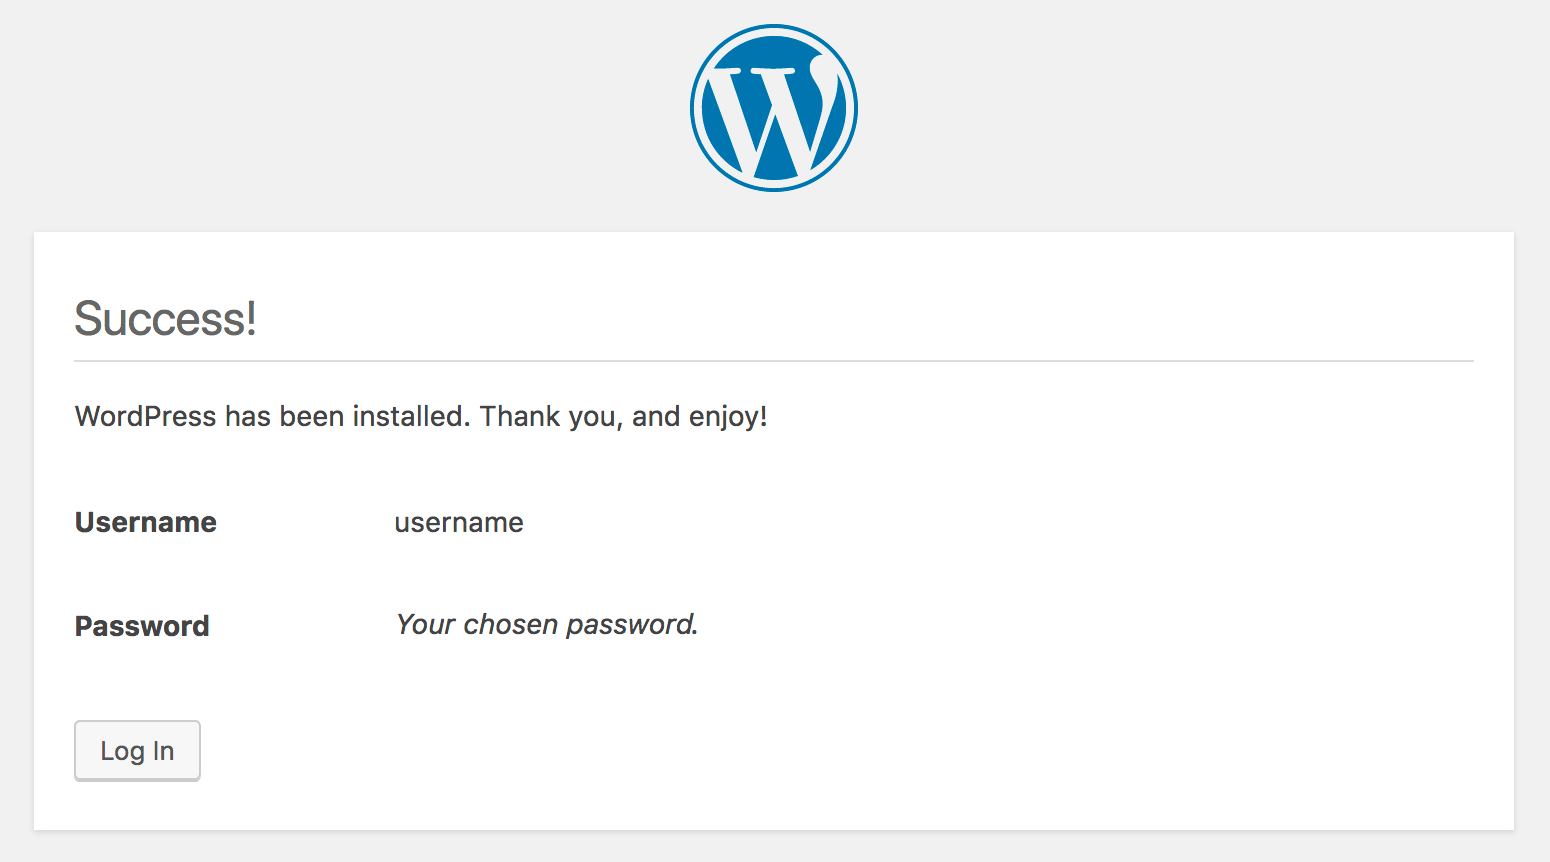
Simply click Log In and you’ll be on your way with a new WordPress website! This will regain your access to the site, and you’ll be working with a completely clean slate.
Resetting WordPress
Resetting your WordPress website may not be the most thrilling task, but it is a good skill to have in your repertoire for fixing broken websites and cleaning up unnecessary files. Even if you use a plugin, it gives you the power to understand what is going on underneath the hood when resetting everything from scratch.
In this article, you learned how to do this manually in four steps:
- Delete the WordPress database.
- Create a new database.
- Remove unnecessary files.
- Run the WordPress installation script.
What questions do you have about resetting WordPress? Let us know in the comments section below!