
Web servers use configuration files to enable or disable functionality. One of the most important of these files for WordPress users is the .htaccess file.
The WordPress .htaccess file enables you to customize aspects of your site’s functionality. For example, you can use it to ban specific IP addresses from accessing your website or password protect specific webpages, and that’s just for starters.
Understanding how it works and what you can accomplish with it can be confusing without guidance. In this article, we’re going to talk more about the WordPress .htaccess file, where to find it, and what it can do for you. We’ll cover five ways you can use it to improve your WordPress website. Let’s get started!
What the WordPress .htaccess File Is (And Where to Find It)
.htaccess is one of WordPress’s core files — the default WordPress installation files that are responsible for the platform’s core functionality. This particular file includes settings that determine how WordPress renders URLs and how it interacts with your server.
Modifying the .htaccess file isn’t as scary as you might think. As long as you follow instructions and don’t add or delete code without knowing what it does, you should be fine. However, you should always create a backup of your website before making such changes, just in case.
To find and edit the WordPress .htaccess file, you’ll want to use an FTP client, such as FileZilla, or the file manager provided by Cpanel and similar solutions. Connect to your website using the client and then navigate to the root folder (a.k.a. root directory) of your web directory (often the public_html folder) on your server and open it. You’ll see a list of php files. The WordPress .htaccess file will be right inside:
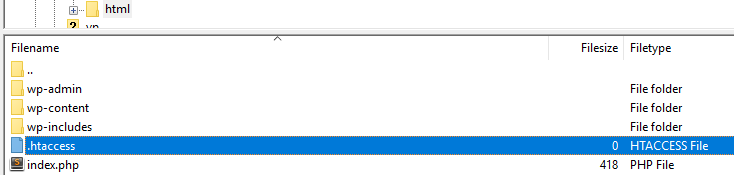
If you do not see the .htaccess file, it may be because your file browser has hidden files that start with a period because these important configuration files don’t need to be edited often. To show hidden files, there is a setting you’ll need to check or uncheck. You may need to Google instructions on “how to display hidden files with <name of your FTP client or file browser>.”
You can right-click on the file and choose the View/Edit option, which will open it using a text editor. This enables you to make changes to the file and save them.
After opening the file, you should see code very similar to this:
# BEGIN WordPress

RewriteEngine On
RewriteBase /
RewriteRule ^index.php$ - [L]
RewriteCond %{REQUEST_FILENAME} !-f
RewriteCond %{REQUEST_FILENAME} !-d
RewriteRule . /index.php [L]

# END WordPress
5 Ways to Use the WordPress .htaccess File to Improve Your Site
If you followed our earlier advice, you should already have a backup in place of your entire WordPress site. However, it can also be a good idea to save a copy of your .htaccess file before you edit it. That way, if something goes wrong, you just need to restore a single file instead of a full backup.
Once you’ve done that, you can start editing your file. There’s a lot you can accomplish with .htaccess, so we’re going to show you five examples just to give you an idea of the possibilities this file offers.
1. Redirect Visitors to a Custom Error Page
One of .htaccess‘ most useful features is how it enables you to implement redirects in WordPress. This way, you can send users who try to visit specific URLs to other pages. It’s a particularly useful feature in cases where visitors try to access pages that don’t exist, instead of displaying a 404 error message. Redirects also have important SEO benefits.
To implement this feature, open your WordPress .htaccess file and add the following code:
RewriteEngine On
Redirect 301 /original-url/ http://example.com
You will, of course, need to replace both placeholders in that code. For example, if you want to redirect people that visit http://yourwebsiteurl.com/test-page to your homepage, here’s what that would look like:
RewriteEngine On
Redirect 301 /test-page/ http://example.com
With this approach, you can redirect users to either a custom error page or to any other section of your website. However, for it to work, you’ll need to monitor the 404 errors your visitors are getting, which you can do either using plugins, like Redirection, or through an analytics tool.
2. Ban Specific IP Addresses
In some cases, you’ll want to ban specific people from accessing your website. It could be because they’re trying to steal your content, hijack your site, or they’re acting abusive. If you run into one of those situations you can quickly ban their IP address from your website just with a few lines of code.
Here’s the code you need to add to .htaccess to implement this feature:
Require all granted
Require not ip xxx.xxx.xxx.xxx
The IP address you want to block needs to replace the xxx.xxx.xx.x placeholder in that code. Just be sure to use the correct IP address so you don’t block the wrong person.
To put this feature in action, you might want to find a way to monitor which IP addresses are accessing your website. You can use a security plugin with activity logging features to keep an eye on suspicious activity.
3. Password Protect Your WordPress Folders
One of the coolest things you can do with .htaccess is password protect specific directories. This way, you can ensure only the people you allow have access to them. However, this process requires a little more work than just editing .htaccess.
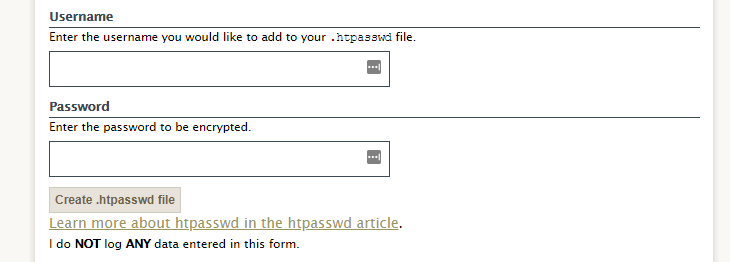
The first thing you need to do is create a txt file called .htpasswds, which will contain your username and the password you want to use. To keep things easy, we recommend you use this online .htapsswds generator and then download the resulting file to your computer:
Once you have your .htpasswds file ready to go, access your site via FTP and upload it to the directory you want to password protect. In this example, we put it within the wp-admin folder, to protect access to our dashboard.
Now you’re going to create a brand new .htaccess file within the wp-admin directory. To do it, right-click anywhere within the folder and choose the Create new file option, then name that file .htaccess:

Go ahead and edit that file now. It will be empty since you just created it, so add the following code:
AuthName "Admins Only"
AuthUserFile /public_html/wp-admin/.htpasswds
AuthGroupFile /dev/null
AuthType basic
require user yourusername
There are two lines you’ll need to edit here. The first one is the path that goes after AuthUserFile, which needs to indicate where you placed your .htpasswds file. Then, type the username you set within your .htpasswds file where the yourusername placeholder goes.
Save the changes to your new .htaccess file, and you’re good to go. Next time you try to access your dashboard, you’ll see a password prompt come up!
4. Increase Your WordPress File Upload Size
By default, WordPress limits the size of the files you can upload to your website. That way, you won’t get stuck if there are any errors during the upload process. However, you might want to increase this limit to allow for larger files.
Note that you should check with your hosting provider before implementing this change. Some managed hosts, like us here at Pagely, manage these server settings for you and adjusting them could cause issues.
Once you’ve checked with your host, you just need to add a few lines of code to .htaccess:
php_value upload_max_filesize 128M
php_value post_max_size 128M
php_value max_execution_time 300
php_value max_input_time 300
In this example, we’ve increased the max file size to 128 MB. It also gives your website 300 seconds to process uploads before timing out, so it can handle the increase in size. You can increase both settings even further, although 128 MB should be more than enough for most websites.
5. Disable Image Hotlinking
This is relevant for when other people link to your images directly, which puts additional strain on your servers.
That practice is called image hotlinking and you can disable it by adding this code to your .htaccess file:
RewriteEngine on
RewriteCond %{HTTP_REFERER} !^$
RewriteCond %{HTTP_REFERER} !^http(s)?://(www.)?example.com [NC]
RewriteRule .(jpg|jpeg|png|gif)$ http://placeholder.png [NC,R,L]
This code checks if the website that’s trying to load your images corresponds to the URL on the third line (yoursite.com). If it doesn’t, and they’re trying to load an image file that uses one of the formats listed below, it will load placeholder.png instead.
In most cases, website owners come up with an image that says something to the effect of “Stop hotlinking our images!” However, you can replace placeholder.png with any image you want, using whichever name you prefer.
Conclusion
When it comes to your WordPress core files, few of them are as versatile and powerful as .htaccess. This single file governs a lot of important aspects, such as your permalink structure.
In this article, we’ve shown you just a handful of these features. For example, with .htaccess you can:
- Redirect visitors to a custom error page.
- Ban specific IP addresses.
- Password protect your WordPress folders.
- Increase your WordPress file upload size.
- Disable image hotlinking.
Do you have any questions about how to use the WordPress .htaccess file to improve your website? Let’s talk about them in the comments section below!